BIGTIME: Attaching Receipts to Expenses
- Andria Radmacher

- Oct 1, 2024
- 3 min read
Updated: Apr 17
If you invoice out of BigTime, you’ll probably need to add receipts to your expenses. This article will explain how to do that and more. You’ll learn how to:
Add receipts to an expense entry,
Edit, view, and delete receipts for unsubmitted expenses, and
View receipts for submitted expenses.
NOTE: There are requirements when it comes to the type of receipt file you plan to upload. Receipt files need to be in JPG, GIF, BMP, PNG or PDF format, and cannot exceed a file size of 500KB.
Add a Receipt to an Expense
Follow the steps below to add a receipt to an expense.
1. Click TIME/EXPENSE...EXPENSES to access BigTime’s expense feature.
2. Click ADD NEW EXPENSE to create a new expense.
Then, add expense details, like the expense type, amount, and project.
3. Click SELECT A FILE TO UPLOAD and select your receipt for the expense.
4. Click SAVE to save your work.
Your expense entry will appear on the left-side of your window under UNSUBMITTED EXPENSES.A green box will appear in the saved expense if a receipt is attached (see image above).
Receipts and Unsubmitted Expenses
You can edit, view, or delete receipts before you submit your expense report. We’ll explain each option below.
Delete or Edit Receipts
Change the receipt you’ve uploaded—as long as you’ve not submitted the expense. Follow the steps below to learn how.
Click on an expense under UNSUBMITTED EXPENSES.
The expense details will populate on the right-side of your window. Click REMOVE/REPLACE RECEIPT, located near the bottom-right of your window.
BigTime will prompt you with a question box to confirm your action. Click YES to remove (delete) your receipt and click SAVE to save your change.
However, you can add a new receipt by clicking SELECT A FILE TO UPLOAD, next to the cloud icon.
Select your file and click SAVE to save your work.
When you’re ready to submit your expenses, click the hyperlink CLICK HERE TO SUBMIT THESE EXPENSES at the bottom of your screen.
View Receipts
To view receipts, click on an expense under your unsubmitted expenses.
Note: The green box indicates an expense entry with a receipt attached.
The expense details will populate on the right-side of your screen. Click VIEW RECEIPT to see the receipt that you added.
Receipts and Submitted Expenses
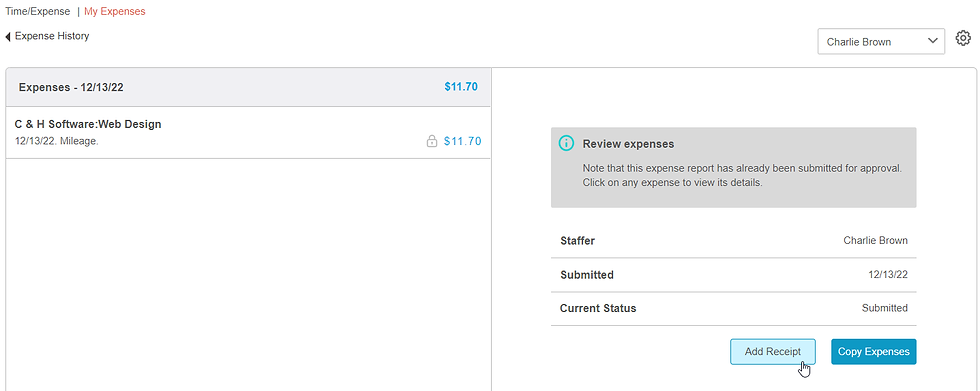
A user cannot go back into an expense to remove receipts once the expense has been submitted—unless the manager rejects the expense. The REMOVE/REPLACE RECEIPT button will not appear on submitted expense entries.
In the image above, notice that there’s no way to edit or remove the receipts attached to this submitted expense report. However, you can view and add receipts for expense entries that have been submitted. We’ll explain both options below.
View Receipts
Follow the steps below to view a receipt for an expense entry that you’ve submitted.
1. Click TIME/EXPENSE...EXPENSE to get to your expense options. Then, click EXPENSE HISTORY near the top-left of your window.
2. Click on an expense report from the list that populates.This will take you to the expense entries for this expense report.
3. Click on an expense entry from the expense report you selected.
4. Click VIEW RECEIPT to see the receipt that you added.
Add Receipts
You also have the option of adding receipts to submitted expense reports. Navigate to your expense history for a specific date range (explained above). Your window should look something like this:
If you have multiple entries, click on the one that you’d like to add a receipt to. Then click ADD RECEIPT, located on the right-side of your window (see image above).
A new window will pop up and you can select a file. Click UPLOAD to add the receipt to the expense.
Then, you can view the receipt you just added or remove it by click on the respective button option.


Comments